
Choosing the blade profiles manually: forcing the profile of each element
To choose the profile of a blade element manually, select that element in Heliciel's 3D view, open its context menu with a right click, then force the profile. The interactive database opens: you choose the profile there and apply it to the element. Heliciel will then use this profile and its performance for that element, at the next rebuild of the blade.
In this page:
- Constant profile law or manual choice?
- Forcing the profile of an element from the 3D view
- Applying the chosen profile to the element
1: Constant profile law or manual choice?
The blade is divided into elements, and each element is described by a profile. If you want all elements to use the same profile, among the two profile laws at your disposal, it is better to choose the constant profile law: Heliciel then applies the shape you chose along the whole blade, and it is the simplest law, recommended for beginners.
You may, however, want to choose a profile by hand for each element. This is the case to copy an existing blade whose profiles you know, to impose a thick profile near the blade root and a thin profile towards the tip, or to test the effect of a specific profile on a single element. In these cases, forcing a profile, element by element, is the right method. To describe the complete geometry of an existing propeller, the page on reverse engineering an existing propeller uses this same forcing.
2: Forcing the profile of an element from the 3D view
By selecting an element of the blade in the 3D interface and clicking the right mouse button, you access the context menu of that element. In this menu, you can force the angles of incidence or the profile of the element. The Profile entry (management of the selection of profile shapes) offers in particular the profile law, Force the profile, the removal of the forcing and the change of the database used to choose the profiles.
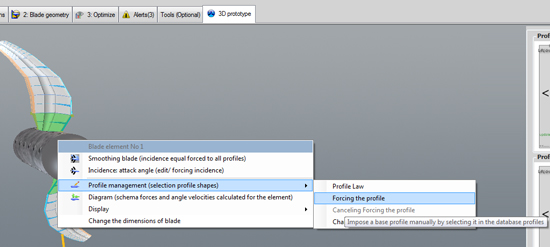
The context menu of a blade element: the Profile entry opens the submenu that holds Force the profile (the menu is shown in French in this capture).
3: Applying the chosen profile to the element
This command opens the interactive database, which lets you choose the profile of the selected element.
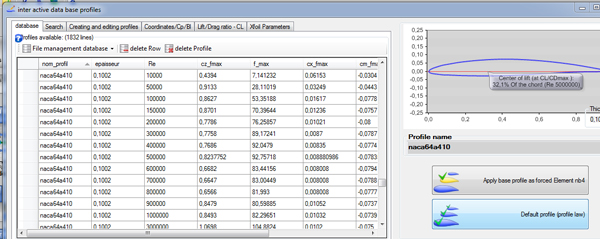
The chosen profile is shown with its name; the first button applies it to the selected element, the second sets it as the default profile for all elements.
Once you have selected your profile, apply it to the selected element by clicking Apply base profile as forced Element. Heliciel will use this profile and its performance (lift and drag coefficients) for the element, at the next rebuild of the blade.
To go further, we can look at the interactive database, read the instructions for using the profile database (interactive data base), or see how the blade thickness distribution influences the choice of profiles.
 Global site map
 Mecaflux
 Tutorials Mecaflux Pro3D
 Tutorials Heliciel
 Tutorials Heliciel PRO CFD
 Mecaflux Store
 Compare software functions
 Quotes, Orders, Payment Methods
 project technical studies