
Wind turbine propeller modeling in heliciel
Build a permanent magnet axial flux wind turbine generator
A permanent magnet axial flux wind turbine generator can be built from very few parts: a rotor carrying neodymium magnets, a stator carrying enamelled copper coils, a casing and two ball bearings. It produces charging current at low rpm, needs no excitation and can be sized to measure. This page follows Steven Fahey's self-build and retells, in our own words, the article on this generator from the book "Le mini éolien" by Emmanuel Riolet (Eyrolles). For Steven Fahey's full text in English (PDF), just follow the link.
See also: the types of wind turbine generator (dynamo, alternator, asynchronous machine) and the components of a wind turbine.
On this page:
- Why neodymium magnets
- Handling magnets without breakage or injury
- How an axial flux generator works
- Sizing the generator coils
- Arranging the magnets to get alternating current
- Making and connecting the stator coils
- Rectifying the current with a diode bridge
- In summary: the strengths of this generator
1: Why neodymium magnets
To produce as much current as possible, you need the strongest possible magnetic field. That is why we choose neodymium magnets, an alloy of neodymium, iron and boron. They are permanent magnets: they keep their magnetization without any power supply. The author of the book puts them at least ten times stronger than conventional magnets. They keep their properties for a very long time, provided you protect them from shocks and excessive heat.
To buy them, the easiest way is to search the Internet for "neodymium magnets". Manufacturers and retailers state the strength of their magnets either in gauss or as pull force in kilograms (or pounds). Do not be swayed by the first seller you meet: compare, and order the strongest magnet for the same density. Magnets exist in almost every shape.
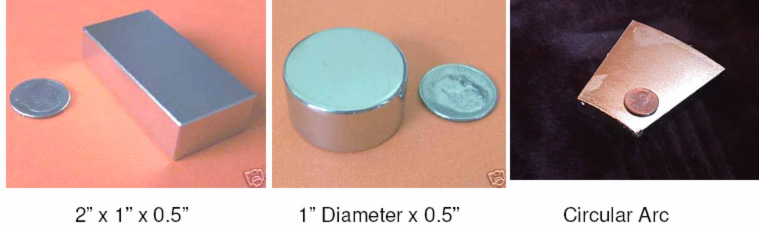
Three common neodymium magnet shapes: the rectangular block (2 × 1 × 0.5 inch, about 51 × 25 × 13 mm), the disc (1 inch diameter) and the arc segment.
For an axial flux generator, only rectangular or round magnets will do. For maximum efficiency and simplicity, we choose the rectangular shape here.
2: Handling magnets without breakage or injury
Warning: handling magnets
You have just received your magnets. Before you rush at the package, a few tips are needed. Magnetism is a great enemy of electronics: keep your magnets away from anything the field can affect. Move sensitive objects, such as your watch, mobile phone or credit card, at least 30 cm away.
Be very careful when handling them too. They are so powerful that they can quickly cause you trouble. The first risk is pinching your fingers hard, the second is breaking the magnets: neodymium is as fragile as it is powerful. If two magnets stick together, the right way to separate them is to slide them apart, not to try to pull them off.
3: How an axial flux generator works
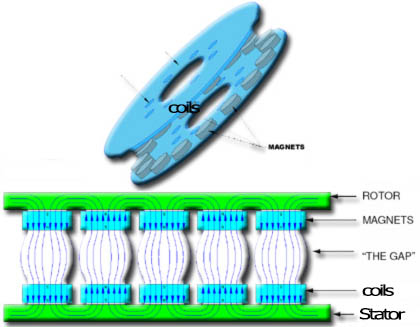
Exploded view (top) and section (bottom): the rotor magnets face the stator coils, and the field lines cross the gap between them parallel to the axis.
This generator is very simple in design. The rotor carries the magnets, the stator carries the coils. A casing holds the assembly, and ball bearings optimize rotation. In all, it consists of a casing in stainless metal or in resin and fibre, a rotor of neodymium magnets, enamelled copper wire and two ball bearings.
The magnets' field crosses the coils parallel to the rotation axis, hence the name "axial flux". As the rotor turns, each coil sees a north pole and then a south pole pass in turn, and the flux through it changes direction. This changing flux creates the alternating voltage across the coil.
The rotor must be made of a material that is both light and very strong, such as wood covered with resin, fibre and resin, or aluminium. Do not skimp on the quality of the ball bearings: they must withstand heavy duty and cope with the stresses of the climate.
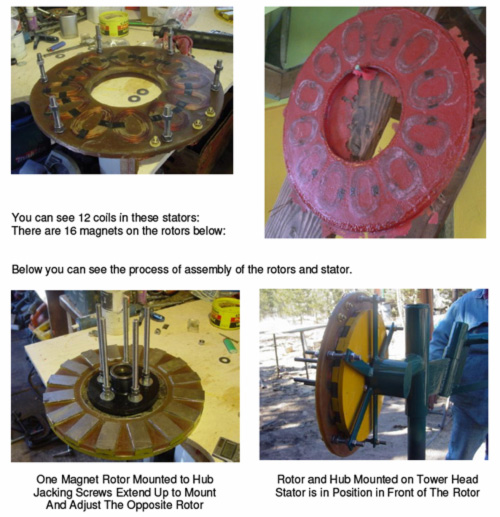
Steven Fahey's self-build: a stator with 12 coils, a rotor with 16 magnets, then the rotor mounted on the hub and set at the tower head, with the stator in front of the rotor.
4: Sizing the generator coils
One of the many advantages of this type of generator is that you can make it to measure, both in size and in performance. To design one that works flawlessly, you first need a calculation that starts from the size of the magnets and their strength in gauss. This calculation determines the cross-section of the copper wire and the number of turns.
Every case is different. The easiest way is to start from plans, which you will readily find on the Internet. You can also just start and adjust your coils until you get the result you want.
To test the output, there is no need to make several coils. One is enough: place it on the stator, turn the rotor and measure the voltage. You then only have to multiply that voltage by the number of coils to get the overall result, since identical coils connected in series add their voltages. Modify the coil until the result suits you.
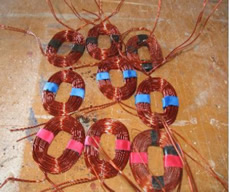
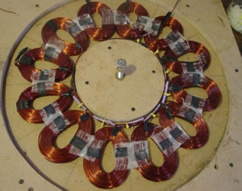
Left, finished coils; right, the coils laid out in a ring in the mould.
Once the result is good, you can make the other coils to the same pattern. In outline, here is what you need to know:
- the more turns on a coil, the more it produces;
- the finer the wire, the more you tend towards voltage;
- the thicker the wire cross-section, the more you tend towards current.
From there, it is all a matter of balance. Ideally, you should get a voltage of 13 volts, with a good current, at 600 revolutions per minute. This is the order of magnitude the author aims at for charging a battery.
5: Arranging the magnets to get alternating current
You must arrange your magnets with the polarity reversed from one magnet to the next, to obtain alternating current. To check the polarity, you need a compass, which shows you the south and north faces.
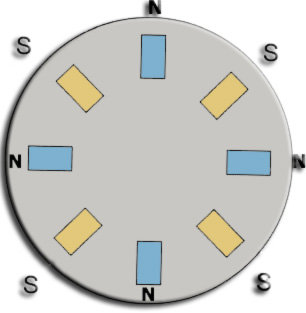
The rotor magnets follow one another alternating north (N) and south (S) around the disc.
6: Making and connecting the stator coils
The coils must be made with care, with windings as regular as possible. If that is a problem, you can salvage ready-made coils from electric motors. This works well if they are exactly the same type and undamaged. You can also go to a professional coil winder: for such a simple job, the bill should not be too heavy.
Once fixed to the stator, the coils are connected in series. To join them, scrape the thin insulating layer off the copper wire over one centimetre with a knife, so that the wire ends make contact. For safety, it is more than advisable to reinforce and protect the connections with heat-shrink sleeving.
The magnet faces must pass as close as possible to the coils, so that the magnetic field is as effective as possible. This calls for a perfect fit of the rotor. To stabilize the coils, cast them in resin: it holds them in place and protects them.
Top right, the stator with its coils cast in red resin.
7: Rectifying the current with a diode bridge
The generator delivers alternating current; to charge a battery, it must be rectified. So install a diode bridge suited to the power of the generator, next to the regulator. If you are not at all gifted in electronics, you will find ready-made ones in any electronic components shop. It is really cheap, and not worth doing without. You only have to connect the wires following the instructions on the case.
8: In summary: the strengths of this generator
This type of generator is ideal for wind power. Its strengths are many:
- it produces charging current at low rpm;
- it has a good overall efficiency;
- its size can be adapted to your project;
- it is economical compared with buying a new generator;
- it is simple in design, hence easy to maintain;
- it is very robust if built with good materials;
- it needs no excitation, hence no friction slowing the rotor and no brushes to replace.
To drive this generator, we now need a driving torque on the shaft. That is the job of the wind turbine rotor blades, which convert the energy of the wind, more precisely the kinetic energy of moving air.
To go further, we can move on to the design of wind turbine blades. We can also compare the generator types mentioned at the top of this page before choosing yours, then size the rotor from the power this generator can absorb.
 Global site map
 Mecaflux
 Tutorials Mecaflux Pro3D
 Tutorials Heliciel
 Tutorials Heliciel PRO CFD
 Mecaflux Store
 Compare software functions
 Quotes, Orders, Payment Methods
 project technical studies